Windows XP Start-Up Repair - Windows 32 BIT and 64 BIT Instructions
For use with THESE Disks:
IMPORTANT: If you are having issues with your Disk, PLEASE do *NOT* leave negative feedback on Amazon. Please allow us the chance to help you out. We can help you with practically ANY PC issue. If you are having problems, please e-mail us at: support@windowsrepairdisks.com. We can help you, OR offer you a 100% refund.
This guide shows you how to use the disk to fix most boot problems in Windows XP (32bit and 64bit).
ISSUE: What issues can this process repair?
Windows Hardware Abstraction Layer (HAL)
Corrupt registry hives (\WINDOWS\SYSTEM32\CONFIG\xxxxxx)
Invalid BOOT.INI files
A corrupt NTOSKRNL.EXE
A missing NT Loader (NTLDR)
Basically ANYTHING keeping you from being able to boot up your Windows XP machine. This will fix 99% of machines that are having problems BOOTING/LOADING Windows XP (Home/Pro/etc).
Please Note: This Disk will NOT restore your Windows to factory default settings, nor is it a full version of Windows. This is a REPAIR disk to help fix your Windows Boot Problem and *NOT* a Disk to reinstall Windows (our Amazon Listings clearly say that). If you have issues, please e-mail us at: support@windowsrepairdisks.com. We can help you, OR offer you a 100% refund. Please contact us first before leaving negative feedback on Amazon. We can help you fix ANY PC issue and would be happy to help you, or refund you. Also, if this disk DOESN'T FIX your problem, you likely have a HARDWARE issue and will need to bring your PC in for repair and diagnostics.
1. Insert your Windows XP Recovery CD and then restart your computer (do NOT try to load the CD when you have Windows booted up. This will NOT work).
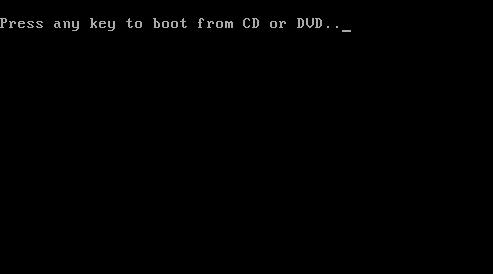
2. Press any key or the appropriate function key (depends on your computer) to boot to the CD. If you are having issues getting the CD to BOOT, please reference this link on how to boot your PC to a CD.
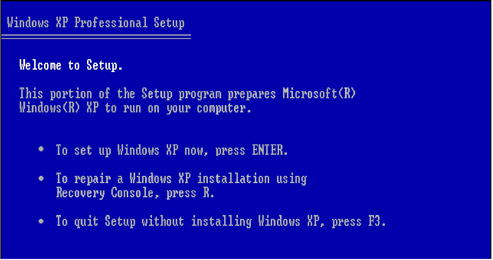
3. Once you have booted from the CD, let it load until you see the screen below, at which point you will press the "R" key to enter the recovery console:
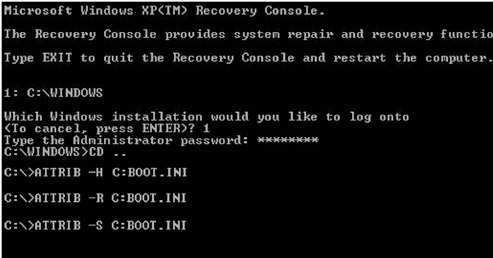
4. After you have selected the appropriate option from step two, you will be prompted to select a valid Windows installation (Typically number "1"). Select the installation number, (As mentioned, "1" in most cases), and hit enter. If there is an administrator password for the administrator account, input it and hit the enter key. After you enter this successfully, you will be in the recovery console at the command prompt.
PROCEEDING WITH THE REPAIR FUNCTIONS
There are eight commands you must enter in sequence to repair any of the issues noted in the opening of this guide. Here we will introduce them and then show the results graphically in the next six steps. These commands are as follows, you will enter each one at the "C:\>".
CD ..
ATTRIB ·H C:\boot.ini
ATTRIB ·S C:\boot.ini
ATTRIB ·R C:\boot.ini
DELboot.ini
BOOTCFG /Rebuild
CHKDSK /R /F
FIXBOOT
5. Enter "CD .." (CD space ..)
6. Now that we are at C:\> we can begin the process of repairing the operating system and that begins with modifying the attributes of the BOOT.INI file. Briefly, BOOT.INI controls what operating systems the Windows boot process can see, how to load them, and where they're located on your disk. We're going to make sure the file is no longer hidden from our prying eyes, remove the flag that sets it as an undeletable system file, and remove the flag that sets it as a file we can only read, but not write to. To do this, we will issue three commands in this step to remove the Hidden, System and Read Only flags. Enter one command and wait for the prompt to enter the next.
Command 1:
ATTRIB -H C:\BOOT.INI
Command 2:
ATTRIB -5 C:\BOOT.INI
Command 3:
ATTRIB -R C:\BOOT.INI
7. Now that we've modified the attributes for the BOOT.INI file, it's up for deletion. The syntax for it is simple: DEL BOOT.INI deletes the BOOT.INI file.
Command 4:
DEL Boot.ini
8. Now for the most important step of our process, the BOOTCFG /REBUILD command which searches for pre-existing installations of Windows XP and rebuilds essential components of the Windows operating system, recompiles the BOOT.INI file and corrects any of the common Windows errors. Windows XP must use /FASTDETECT as an OS Load Option when the rebuild process is finalizing.
Command 5:
BOOTCFG /REBUILD
Enter OS Load identifier = "Windows XP..."
Enter "/fastdetect" If you are using Windows XP Home, you could type "Microsoft Windows XP Home Edition" for the identifier."
9. This step verifies the integrity of the hard drive containing the Windows XP installation. While this step is not an essential function in our process, it's still good to be sure that the drive is physically capable of running windows, in that it contains no bad sectors or other corruptions that might be the culprit.
Just type CHKDSK /R /F at the C:\> prompt. Let it proceed; it could take in excess of 30 minutes on slower computers, when this is finished move on to the tenth and final step.
10. When you are at the C:\> prompt, simply type FIXBOOT. This writes a new boot sector to the hard drive and cleans up all the loose ends we created by rebuilding the BOOT.INI file and the system files. When the Windows Recovery Console asks you if you are "Sure you want to write a new bootsector to the partition C:\?" just hit "Y," then enter to confirm your decision.
FIXBOOT RESULTS AND WRAP-UP
It's time to reboot your PC by typing EXIT in the Windows Recovery Console and confirming the command with a stroke of the enter key.
Remove the CD from your drive and try to boot into Windows normally. With any luck, your PC will boot successfully into Windows XP as if your various DLL, Hive, EXE and NTLDR errors never existed. If your still having issues, you most likely have a hardware issue like a failed hard drive, which no recovery disk will be able to fix.
NOTE: If you are now able to Boot into Windows, that means the Disk worked! However, if you are still having issues on your PC, you may want to run a SYSTEM RESTORE from within Windows. This will allow you to take the computer "back in time" a number of days, or even weeks, to when the PC was working fine. For instructions on how to run a System Restore, please click here.
Please Note: This Disk will NOT restore your Windows to factory default settings, nor is it a full version of Windows. This is a REPAIR disk to help fix your Windows Boot Problem and *NOT* a Disk to reinstall Windows (our Amazon Listings clearly say that). If you have issues, please e-mail us at: support@windowsrepairdisks.com. We can help you, OR offer you a 100% refund. Please contact us first before leaving negative feedback on Amazon. We can help you fix ANY PC issue and would be happy to help you, or refund you.